


Previously, I explained how to record a Native American Flute music back at home. But before your recorded music can be released, it must be edited. Noise must be removed, problematic basses must be cut off, additional background sound may be added, and all of this must sound good. The process of mixing different sounds together into a music track is called “mixing”. And making sure this track sounds good is called “mastering”.
Professional sound engineers work hard to achieve great sounding musics. Yet basic editing for a single instrument (native flute in our case) can be achieved back at home, too.
Your flute may got recorded in one of many formats, but most recording software or tools record in WAV. Often, the WAV will have to be converted into a more suitable format. Other well known formats are mp3, wma, ogg, flac and such. You can use a search engine like Google to find a good sound converter, or you can try an on-line one, like Media.io. This knowledge may be useful when your editing software can’t use a file format your recording gear makes.
Getting the Editing Software
For the purpose of your home recording, you may wish to choose some free software from the Open Source category. A popular and free Audacity is a good choice.
The Internet is full of Audacity recommendations – when someone writes about home sound editing, Audacity is mentioned almost all the time. It’s because it’s a good software that is open source and available for free to install and use.
Audacity can be downloaded from here: Audacity Team
How to Edit Native American Flute Music with Audacity
Open Audacity now, then open the “File” menu and go to Import menu, then click “Audio…“. Import the file you wish to edit.
If you never used Audacity below, search on-line for some basic tutorials, for example on TutsPlus.
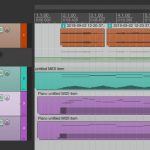
Now that the file is imported, you should see something like this:
A single track in Audacity.
The large blue areas are the actual sounds – the thin line between them is the recorded silence and pauses.
With the sound piece ready, you can get to editing process.
Remove Noise
First, we need to remove any unnecessary noise that might have been recorded. This noise is created by your environment, computer, dogs barking in the background etc. But mainly, it’s a constant background buzz that must be removed.
First, select a piece of noise area to get a noise sample. To select it, use your mouse, click it and select a piece of “empty” space between the actual flute. We’re getting a noise sample so that Audacity can later recognize what the noise in the recording sounds like.

Select a small piece of the empty track.
While highlighted, go to Effects -> Noise Removal in the menu. Open it. You will see the following window:
A noise reduction window.
Click “Get Noise Sample” – this will close the window, but the sound sample will be saved.
Then, highlight the entire recording by clicking it, and then using the CTRL+A combination (or other combination on Windows or Mac OS), go to Effects -> Noise Removal, set “Noise reduction (dB)” to anywhere between 8 and 20 and click “OK”. This will remove the noise previously saved. The louder the noise is, the greater the value in Noise Reduction should be.
Once this is done, you can move on.
Silence
Now you should create some silence between the actual music. Often as you record, additional noises can be recorded, like munching or tapping your fingers over flute and such. These sounds must be removed. You can remove them piece by piece, or you can just add a constant silence the entire section between actual flute sounds.
To create the silence, select the areas between actual music:
Select the track between the actual flute sounds.
Then chose Generate -> Silence from the menu and in the new window that appears, click “OK”. The duration of the silence is set automatically based on the selected piece of the track.
Silence generator.
Repeat this for the entire piece of your imported music. This will leave the sounds of the instrument only.
Now we need to deal with basses and apply a hi-pass filter. We do so to remove some unpleasant artifacts that may disrupt the sound on most speakers.
Bass Cut
You need to use an equalization plugin and remove the unpleasant bass artifacts from the recording. Select the entire recording (CTRL+A), and go to Effects -> Equalization.
An qualization window – Bass Cut option has been selected from the lower menu.
From the “Select curve” menu at the bottom, choose “Bass cut” and click “OK”.
Hi-Pass Filter
And finally, you can use a hi-pass filter on the entire recording. Select the entire recording again.
Go to “Effects -> High Pass Filter” and apply the following settings. Then, click “OK”.
Use these settings for the High Pass Filter.
Reverb Effect
Finally, we can add some space to the sound by creating a well known “echo” or “canyon” effect for your Native flute. Creating a great canyon effect for a Native Flute is not a simple task, but if you don’t need anything too fancy, you can use Audacity’s basic reverb plugin.
Select the entire recording, and go to Effects -> Reverb. Apply the following settings to get a nice depth to the recording.
Basic reverb effect for your Native American Flute.
Getting Free Sounds for the Background
If you need to add some background sounds for your flute, for example forest birds, or eagle in the canyon, you can find such free sounds on FreeSound.org. Some of the pieces there are licensed as Creative Commons and they require attribution. Other pieces are released to public domain and you can use the for free entirely. Just download the sounds you like, import them from the import menu in Audacity, and set their volume and you’re done.
Summary
The above techniques of editing your flute music are very basic. They are not of professional quality, but for basic music publishing they are enough.
Don't forget to become a fan on Facebook and subscribe to new posts via RSS or via email.
More from my site
 How to Produce Native American Flute Music at Home
 How to Improvise on Native American Flute
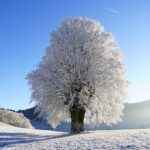 How to Play Jingle Bells on Native American Flute
 How to Play “Dakota Love Song” on Native American Flute
- How to Play “Everwood Theme” on Native American Flute
 How to Play “Halo Theme Choir” on Native American Flute
 via EMAIL