


By now you should have a dry branch (see: How to Make Branch Flute – Part 2). It’s time to create a flute out of it. To do so, we need to create the inner chambers with a plug between them, and a sound mechanism above them. But before we start carving, we need to split the branch in two. In this lesson you will learn how to split the branch and how to prepare a safe, yet simple workspace that will allow you to make a branch flute.
First, some planning is required. You should look at your branch, and analyze where the sound hole will be, where the sound chamber will be, and where the air chamber will be. Also, for the purpose of this series of tutorials, I assume that you do not wish to achieve a specific key of the flute – instead, you work with what you have. That is if the branch is 30 cm long, then you will make a 30 cm long flute. When the branch is 60 cm long, you will make a longer flute.
It’s always best to start with smaller flutes and using what you have, instead of targetting some specific key if you’re just a beginner. From the very beginning I wanted to make a deep flute in the key of F, but I had to spend at least a year making smaller flutes in the keys of B or A, before I’ve learned how to create bigger flutes.
In order to start working on the inside of the flute, we must find our way into the branch. We do this by splitting the branch into two halves.
Splitting the Branch
First, a branch must be splitted in two. Those do not have to be equal halves – you just need to get inside the wood.
This can be done with a hatchet, but I suggest using a knife. A pocket knife or similar works good. It may be impossible to split a branch with a crafting knife because it’s too thin and it may break easily. Generally, the blade should be thick enough, but not too much – pocket knife’s blade is one of the best choices. The thiner the blade, the easier it is to split the branch in two without tearing out the edges of the two halves.
Remember that you’re splitting the branch now, but later on you will have to put it back together and glue it in order to make a flute. That’s why tearing out the edges is not a good idea ;).
You may notice on the photos that I’m splitting the branch in a normal room with a wooden floor – that’s why I’m placing the branch on a thick piece of felt – to protect the floor and minimize the noise. Place the branch on the felt or some other surface, vertically, pointing up. Then force the blade into a branch first, using the strenght of your muscles – you just need to force it 2 or 4 mm into the branch, like on the photos – then use a hammer or the force of your muscles to push the blade further down. No rush – do this piece by piece, slowly.

First, force the blade into the branch, starting from the top, and push the blade down, with your muscles or with a hammer.
Some branches are very soft (usually when dry) and the blade gets into them with no problems. Other branches are much harder and it may take a lot of strength and patience to split them. Remember when I told you in the previous lesson (How to Make a Branch Flute – Part 2) that knots and offshot areas are not welcome? It’s because pushing the blade through them:
- May tear out the edges so seriously that putting the branch back together to glue it will not work.
- Or the branch blade will turn at wrong angle, and instead of splitting the branch, you will just cut out the piece of wood starting from the top of the branch up to the knot or offshot area.
Almost done with splitting. In the middle you can see a teared edge – it’s what must be avoided, but if it happens, it can still be fixed later.
As you reach the last few centimeters of the branch, be careful, because the branch may split up to the end – it’s not a problem, because in most cases, it should split correctly. What you should look out for is the “jump” – the blade may jump down quickly, so keep no fingers below it, at all :).
A branch split in half.
As you can see on the photos, I leave the bark on the branch – it helps keep the edges of the branch where they should remain – on the branch ;).
When you work with wood, especially one that comes directly from the forest, you need to understand that every single piece of wood is unique and it behaves like no other. There is no way to explain this through any book – you need to learn how to “read and experience” the wood through experience, by working with it.
Once the branch is split, let’s move on – don’t leave the two halfs to dry any further, they must be carved and laminated back together as fast as possible – it’s a safety principle. If the branch is not dry enough, it may dry a bit further once glued back together and, it the moisture isn’t that great, the flute should be fine. But if left untouched, the two halves may dry further differently, and it won’t be possible to glue them together anymore in the future, because their shape will be different already.
Sometimes, because of the way the grain goes in the branch, the blade will “spiral around” the branch – this is not a big problem for the flute itself. It just means you will have to slightly turn the half around when carving it.
Marking the Inner Chambers
Look at the illustration below. This is a branch less than 40 cm long.
This is how the chambers will look inside, and where you should mark the borders of chambers.
To start carving the chambers within the branch, we need some planning and drawing. We need to do some “math” and draw the lines that will mark the air support chamber, the inside block and the sound chamber. Here’s the basic math:
- If the branch is less than 40 cm long: start with the mouthpiece area, and mark 2 cm down the flute – this is the beginning of the air support chamber, and the end of the front wall, in which we will make a mouthpiece hole later. From that 2 cm mark, mark 5 cm down, and this is the end of the air support chamber, and the beginning of the plug. Mark another 2 cm down, and this marks the bottom end of the plug. Everything else down the flute is the sound chamber.
- If the branch is more than 40 cm long: start with the mouthpiece area, and mark 2 cm down the flute – this is the beginning of the air support chamber. From that, mark 10 cm down, and this is the end of the chamber. Mark another 2 cm, and this marks the bottom end of the plug. Everything else down the flute is the sound chamber.
This is a simple math – these measurements are not “rocket science”, as Charlie of Blue Bear Flutes says. Basically, if we have a short branch, we want to make as much of it to be a sound chamber, so the air support chamber gets smaller. But normally, the air support chamber (called SAC in short) should be anything between 10 and 15 cm long.
Holding Down the Piece
Now that you have the basic math behind you, prepare your workspace, like the one on the photo below. I always place felt on the desk, because it makes the surface less slippery. Place the vice on the desk or the workbench, and use it to hold down the branch’s half. As you can see, the branch above is a result of what I call a “spiral twist”, mentioned earlier, when the blade “spiral around” the branch. If you have something similar with your branch, in order to carve it, you will have to release it from the vice, turn it a bit, and hold it down again from time to time. This way you will always carve a flute surface.
You need to apply the pressure of the chisel from the top to bottom, not from left to right or right to left – this may cause the chisel to slip and hurt you.
Also, I place two wood pieces on both sides of the branch and tight them so that the branch won’t move to sides. I hold the wood pieces with woodworking clamps. Now, the basic workspace is ready for work. Always work on wood that is clamped down or hold down with a vice – it’s much safer this way.
Workspace.
Put the branch in the vice and clamp it down. One more thing:
On the photo below, you can see that I’ve placed a black duct tape on the plug area – I did so, because this way I can make sure my chisel won’t tear out the pieces of the plug – this would be troubling. The plug (wall) between the two chambers must be sealed and airtight, it’s part of the Native American style flute’s mechanism. This black tape also marks the area about 7 cm down from the mouthpiece area (the north end of the branch), as the branch was less than 40 cm long.
Hold down the piece of branch with a vice. Two small wood pieces under the vice acts as a support for the branch, so that it won’t fall down from the vice.
The workspace is ready, and the branch is split in two. In the next lesson you will learn how to cut the borders of the chambers, and (finally!) how to carve the chambers. Don’t forget to share this tutorial series with your friends if they’re interested in making their own Native American style flutes.
Do you have any other advices on splitting the branches or preparing the workspace? Share your ideas in the comments, please!
Don't forget to become a fan on Facebook and subscribe to new posts via RSS or via email.
More from my site
 How to Make Brach Flute – Part 8: Finishes
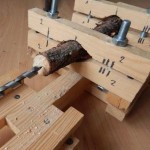 How to Build a Jig for Drilling Branch Flutes
- How to Make Branch Flute – Part 7: Sound and Tuning
- How to Make Branch Flute – Part 6: Sanding and Gluing
- How to Make Branch Flute – Part 5: Creating the Sound Mechanism
- How to Make Branch Flute – Part 4: Carving the Main Chambers
 via EMAIL