


More advanced woodworkers might be interested in making flutes with power tools, such as routers or lathes. This is especially useful if you wish to turn flutemaking hobby into a job which requires making a bit more flutes and usually not from branches, but from lumber. So today we will discuss just that – power tools for making Native American flutes.
Safety warning – power tools are dangerous, so learn how to use them responsibily, before you start using them :). Especially if you’re a minor, do not use power tools without supervision.
We will start with learning about power routers and building simple jigs for routing flutes.
This post has been originally published in my paid, printed flute manual, but since I received a lot of questions about power tools for flutemaking, I decided to share it on the blog.
This article is not endorsed by any company making products seen on this website.
Routing the Flute’s Chambers
High-quality inner chambers can be created with routers and router bits. This is a great option for those who want to dig deeper into woodworking, or already have the necessary power tools, or for those who think about their own flutemaking business.
A router is a power tool that is basically a big engine, to which you can mount a router bit – a router bit is a cutting element.

A router.
The photo above shows a standard power router that cannot be mounted to a router table. (1) is the router’s base – it slides on the wood. The (2) is the router bit – it is lowered through the hole in (1) into the wood. (3) should be considered a “fence”, it’s official name is router’s edge guide – it can be pushed towards the guiding rail (or the edge of router wood), so we make straight cuts in the wood.
You can find a simple router for amateur use on Amazon (aff).
There are many shapes of router bits, each of them capable of cutting various shapes in the wood. For flutemaking, we use two types of router bits: round bits for making the chambers, and flat bits for flattening the nest area.
My basic router bits – two round for flute’s chambers, one flat for nests.
On the photo above, the left bit is 20 mm wide, I use it for most flutes. The middle bit is 16 mm wide – I use it for small flutes. Both these two bits are round, and they are used for carving round halves of sound and air chambers. The right bit is a flat 20 mm wide bit that I use to make flat nests.
You can find round router bits on Amazon (aff).
If you haven’t used router before, be sure to watch tutorials on YouTube, but mainly, read the safety chapter in the router’s user manual. Router is a powerful machine, and routing bits are extremely sharp. They may cause great harm if you’re not careful. Use ear and eyes protection, and either use a face mask, or invest money in dust removal system for woodworking workshop. Also, never change the routing bit if the device is still plugged into the electrical socket.
Seriously, take the plug off the socket before changing the bits. I used to have this awful (quite stupid, too) habit of changing long drill bits in my hand drill while keeping my fingers on the trigger – it took me a while to get rid of this habit. Fortunately, I still have all my fingers.
Schematic 1 – basic schematic for routing a flute.
Schematic 1 shows you the general goal – two halves of lumber, cut to measure and routed. The above half (2) has a nest ready (1). Bottom one is just plain routed (3). If you have a very small router bit, you can already make a half of the air channel (4) in the mouthpiece.
Two Types of Routers
There are two types of routers – table routers, that are mounted under a special table. In this case, the router bit faces upwards in this case. And there are hand routers, that cannot be mounted in the table, but must operate by hand. In this second type, the router bit faces downwards.
I never used a table router, because I couldn’t find any router here in Poland that could be mounted below the table.
Personally, I use hand routers. Table routers are quite easy to use, you just move the fence to proper position, so that you can push the lumber to the fence, keeping the center of the router bit on the center of the lumber piece. Then you just place some wood blocks where you want routing to stop, and route both chambers in two lumber pieces.
A general idea for routing flute – build a jig, place a piece of lumber in it, and route it :).
- Piece of lumber – one half of the future flute.
- Hand router.
- Router’s edge guide.
- Flat surface.
- Jig – in this case, couple of wooden boards to hold the routed piece.
The arrows point the places, where you should place stop blocks.
The Jig for Making Native American Flute
For the purpose of hand router, you need to create a jig.
Basic jig for routing.
A simple jig for routing flutes is a rail, like the one above. I mount it to my workbench with woodworking clamps. A piece of lumber is placed in the middle, and I slide the router above it.
There are countless ways to build a jig for making flutes – the above one is just an example that worked well in my case. With bigger budget, I would have create something fancier, but so far, the jig I use works just fine.
Take one more look at my jig’s photo:
- Jig is 910 mm long on the inside rail.
- Jig is 120 mm wide.
- Guiding rails are 40 mm wide each.
- The middle groove (rail) is 40 mm wide – enough to fit a 40 mm wide lumber piece for the flute. I don’t own a table saw, so I buy precut lumber pieces that are 40 mm wide.
(A) is the front block – it’s there to stop the router from cutting right through the lumber – instead, it blocks the router’s movement, so the air support chamber is not cut open.
To build this jig, use whatever wood you have – the whole point is to create a rail with a row in the middle, into which you can put your lumber piece to be turned into a flute. Look at the photo below:
![]()
(A) is the front block – it just stops the movement of router. (B) is the secondary, movable block. In this case, it is mounted 220 mm from (A) – in other words, (1) equals 220 mm – but this is not a number set in stone – more on that in a minute. (2) is a piece of lumber that will be routed and turned into one half of the flute. Basically, you put the lumber piece into the rail, and mount the (B) block.
Then, you mount the router bit in your router. Recall that “fence” thing, the edge guide on the router’s photo a few paragrahps earlier (it was marked as 3rd element). It is pushed against the (1) wall on the next photo. This edge of the rail is used to guide the router straight.
The router moves between the blocks, routing the front air chamber.
You need to set up this fence element so that the middle of the router bit matches the middle of the lumber piece. When this is done, and everything is secured, you carve between blocks (A) and (B) with the router bit. Here is where things get complicated. I put my (B) block 220 mm away from the (A) block because this space is enough for me to move my router back and forth so that I can carve 100 mm long air support chamber. But if your router’s bottom stand is larger than mine, or smaller, you will have to do the math yourself.
Each router comes with a user manual, in which instructions for calculating distances from the edge of the material to the routing point are described. Use them to calculate how to set up your router’s edge guide for your jig, so that the router bit can cut through the center of the lumber in the jig.
Basically, you need to set up the (A) and (B) wall in such way, that after routing the lumber you get a 100 mm long air support chamber. Calculate the distance from the middle of the router bit to the edge of the router’s bottom stand, and set up (A) block. Then, mark this measure down the jig, and add 100 mm, and you should know where to put the (B) block.
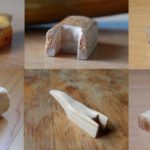
Preparing to make the sound chamber.
When my air support chamber is ready, I move the (B) block towards the (A) block. Now (1) is 110 mm long – when I route the lumber through (2) area, I will stop on (B) block, and this will leave me with 15 mm long wall between two routed chambers.
Router movements to create the sound chamber.
Again, you need to do the math to make sure you do not cut through the inner wall that will separate two chambers of your flute. All of this is a simple math, that can also be done visually – you won’t have any problems with that.
Summary
Obviously, you can see I’m not very good with math, precision etc. But basics are quite simple, and more skilled woodworkers will improve on my ideas, which aren’t original, of course. A lot of people make Native American fltues this way.
That’s all for Part 1 – everything else will be posted in Part 2 soon :).
Don't forget to become a fan on Facebook and subscribe to new posts via RSS or via email.
More from my site
 How to Build a Block (Bird, Fetish) for Your Native American Flute
 Beauty in Imperfection. Building and Playing Native American Style Flutes, and the Japanese Art of Wabi Sabi
 How to Play Jingle Bells on Native American Flute
 Questions and Answers About Native American Flute – Part 1
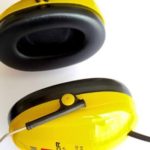 What You Should Know About Hearing Protection When Playing NAF
 How to Play “Uncharted” Theme on Native American Flute
 via EMAIL