


Legends and myths says that it’s possible to make a flute using only a pocket knife and a few sticks. Well, being there, tried that, lost some blood… Anyway, these days, we have a lot of other tools which we can use – they’re easily accessible, and, in most cases, they’re easy to use. Just remember about the safety rules when making flutes. Before you learn how to make Native American style flutes, you should prepare the necessary tools.
Personally, I consider two categories of the tools for flutemaking – the basic tools that allow you to make a nice, working flute but do not require too much space or electricity; and the advanced tools, that require a lot of space and some socket to plug in. In this article, I explain the basic tools – the minimum that you need in order to make a working flute.
The Basics are Simple
With the tools from this list, you will be able to make a Native American style flute that looks nice, and plays nice as well.
Note: this list of tools and items contains affiliate links to Amazon. By purchasing things there through my links, you support the free knowledge and music on FluteCraft.
When I make the flute, I use: a thick knife to split the branch; a craft knife, two types of chisels (one round and one flat), wood glue, sanding paper, woodworking clamps, some brushes and pieces of fabric to put oil and laquer and an electric burner along with small power drill to do some holes. Some final touches of the sound mechanism are done with small files. Most of these tools are small, require little space and only few of them require some electricity. In the end, a nicely sounding flute can be made with such simple tools – no big routers or sanding power tools are required. If you have these tools, or at least some of them, in your home already then you will save some money. If you don’t, you need to do some shopping.
And if you ever wondered what’s cheaper – buying a flute or making a flute – the answer is obvious. Buying a flute is a better deal :). But where’s the crafty spirit then?
Here’s a list of tools along with some explanations of their purpose in flutemaking.
Here’s a fast note – handtools are surprisingly deceptive, because we usually think that power tools are dangerous, so we take great care when using power tools, but we don’t consider handtools dangersou – after all, why should we if they’re not like a fast moving saw blade, right? This false belief is a cause of many injuries caused by hand tools, so please remember – false beliefs make handtools very deceptive and dangerous for your body.
The most basic thing you need is a workbench – personally, I use an old wooden desk that I used to do homework on when I was a kid. It still serves a purpose. Remember that your workbench doesn’t have to be professional woodworking bench, but it has to be strong and stable. As you make flutes, often a lot of force is applied – if the bench is strong enough, it won’t break under the stress.
- My bench is 55 cm by 100 cm, and I usually use 1 meter on two sizes to move around. I don’t need a bigger space to make simple flutes, and neither should you. If you have a workshop already, that’s great! If you don’t, then you can simple find a small corner to work.
Knives
A knife can cut things :). Cut the bamboo, cut out the holes, the nest, the block, or round the mouthpiece and round the end of the flute, and take off the bark – well, it’s a useful tool. But using only a knife to make a flute requires a lot of skills, that’s why I teach the use of other tools for flutemaking. But a knife will be very important, anyway. Especially the type of knife known as “craft knife” – one used by crafters, artists, or model makers.
Anyway, I use and recommend:
- A strong pocket knife – it’s great to split the branch in two. I don’t recommend using a hatchet to split the branch, because hatchets are a bit too wide – a pocket knife blade is thin yet strong, thus it won’t break away pieces of the branch on the borders of the two halves.
- A set of craft knives
 (aff) with different blades, or a single craft knife with exchangeable blades. A craft knife is also very useful to “smoothe” the outer surface of the wood.
Remember that you should always use the knife outward, not inward. Never move the blade towards you while making cuts – cut things by pushing the blade outwards, away from you.
Handsaw
Branches and lumber must be cut to length – this requires a handsaw![]() (aff). There are many types of saws available – yet you should choose a basic wood saw for your basic flutes, because so far, there’s no need for anything else. Of course, if you wish, you may use power saws of any sort. A normal hand saw will be enough.
(aff). There are many types of saws available – yet you should choose a basic wood saw for your basic flutes, because so far, there’s no need for anything else. Of course, if you wish, you may use power saws of any sort. A normal hand saw will be enough.
A Burning Tool
My burning tool used for tuning.
Electric burning tool![]() (aff) is quite cheap to purchase – once plugged into an electric outlet, they can be heated up enough to burn through a wood with proper strength, and with far less strength when burning through spruce or pine or some other types of hardwood and softwoods. I use a burning tools for final tuning – this can be achieved with a dremel or similar tool, but a simple burning tool can easily enlarge the finger holes and bring their notes to a proper tune.
(aff) is quite cheap to purchase – once plugged into an electric outlet, they can be heated up enough to burn through a wood with proper strength, and with far less strength when burning through spruce or pine or some other types of hardwood and softwoods. I use a burning tools for final tuning – this can be achieved with a dremel or similar tool, but a simple burning tool can easily enlarge the finger holes and bring their notes to a proper tune.
Usually when I make the finger holes in the flute, I use a power drill to drill small holes, and then I use the burning tool to expand the holes, thus brining their notes to scale (and that is callled “tuning”).
Sanding Paper and Diamond Files
You should have sheets of sanding paper ready. Few grits of the paper may be required – very coarse for primary sanding (80), and some fine grits for final touch (150 and 220 should be enough). If you care for more smoother surface, even higher grits are suggested, up to a 1000.
Both the inside and the outside of the flute’s tube must be sanded for a clean and smooth surface – this will improve the sound quality of the flute. And diamond files![]() (aff) are required as well – the smaller the better – they are meant to shape and finish the entire nest area and the sound mechanism of the Native American style flute.
(aff) are required as well – the smaller the better – they are meant to shape and finish the entire nest area and the sound mechanism of the Native American style flute.
Drills and drill bits
Drills![]() (aff) may be required to drill some holes. A hand power drill should be enough. You can use a table drill as well.
(aff) may be required to drill some holes. A hand power drill should be enough. You can use a table drill as well.
I use standard drill bits![]() (aff) – nothing “pro”.
(aff) – nothing “pro”.
A few drilling bits of different sizes are needed. I use the range of 4 up to 10 mm and it’s enough to make nice flutes. The largest drill bits are used to drill the mouthpiece hole, and I use 4-6 mm drill bits to pre-drill the finger holes. Sometimes, depending on the project, I may want to use a 3 mm drill bit to pre-drill small holes in the nest area, before the nest holes are cut with chisels.
When you make Native American style flutes out of softwood, then cheap drilling bits and drills is all you need. But the harder the wood becomes, the more expensive drill bits you may need, simple because the cheapest may break when drilling in hardwood. Be extra careful. You may want to consider switching to drill bits meant for metal when drilling the smallest holes, like 3 mm – the smaller the drill bit, the easier it is for it to break.
Chisels
Two of my flutemaking chisels.
If you wish to create NAFs made of a wooden branch or some other kind of wood, then chisels![]() (aff) will be required to carve the inside of the branch, not to mention that it’s very useful to create the nest area. A lot of people use routers to do this, and if you wish to do so, that’s fine. The chisel is just a low tech tool for carving the inner chambers. Nevertheless, even with a router, few chisels may be required.
(aff) will be required to carve the inside of the branch, not to mention that it’s very useful to create the nest area. A lot of people use routers to do this, and if you wish to do so, that’s fine. The chisel is just a low tech tool for carving the inner chambers. Nevertheless, even with a router, few chisels may be required.
A chisel is a very dangerous tool – when used in a wrong way, it can create deep stab wounds that will require fast medical attention. Sometimes, you may even cut off an entire finger with a chisel, so be careful. When using chisel, make sure that your hands are behind it, and that you’re pushing the blade outward, paring away from you and there is no part of your body in front of the chisel. Never use the chisel in the inward direction, paring towards you – this is very dangerous.
Chisels often comes with “shields” made of plastic or some other material – they are covering the tips of the blades. When you’re done using the chisel, always cover the blade with its shield. This way, when the chisel falls down from a desk, it won’t make a hole in your leg.
When I make flutes, I usually need the following chisels.
- A round chisel – anything between 15 to 22 mm – I use it to carve the inner chambers.
- Semi-round chisels – anything between 4-10 mm. They are used to clean the inner chambers.
- Straight chisel – I use three straight chisels: 6 mm, 8 mm and 20 mm. The first two are used to cut and make the sound mechanism. The largest chisel is used to level the nest area.
Woodworking Clamps
Woodworking clamps![]() (aff) are used to hold pieces of glued wood together so that the glue can actually work well. They can be used to hold the piece of wood locked in place for carving the inside, or for many other purposes.
(aff) are used to hold pieces of glued wood together so that the glue can actually work well. They can be used to hold the piece of wood locked in place for carving the inside, or for many other purposes.
If you don’t have woodworking clamps, you can hold the glued wood together with rubber bands – it may work, too. Just remember that rubber bands won’t hold the glued wood as strongly as woodworking clamps – and you can grab 4 or 6 clamps quite cheaply. For a single flute, no more than 6 clamps is needed.
Often, I clamp a piece of sanding paper to my workbench, so that it doesn’t move and I sand down different elements – like flat surfaces of the block/bird – this way. Make sure you have at least 6 to 8 woodworking clamps for every 40-50 centimeters of branch.
Woodworking Glue
The branch or other wood halves, once the inside is ready, must be glue back together – for this purpose, a glue is needed. When choosing a glue must be water resistant and waterproof – so that it won’t be affected by constant contact with moisture from the breath.
A lot of flutemakers recommend the Titebond![]() (aff) 2 – the Titebond 3 is said to be better, but it leaves nasty black marks. Well, I can’t say – here in Poland I never seen any Titebond, but since most woodworkers on popular YouTube shows recommend it, I say let’s trust them.
(aff) 2 – the Titebond 3 is said to be better, but it leaves nasty black marks. Well, I can’t say – here in Poland I never seen any Titebond, but since most woodworkers on popular YouTube shows recommend it, I say let’s trust them.
Other Stuff
Finally, here are some simpler things you may need.
- Protection mask for your mouth and nose, and protection glasses and gloves are necessary, as well.
- Rulers, Measurement Tools and Pencils – some rulers, measurement tools and pencils will be very important to do the math and measurments.
- A wood plane (aff) is needed if you make your flute out of lumber to round the flute’s body and bring it to its round, tube-like shape.
- A couple of brushes will be needed if you decide to cover the flute with some shellac laquer or to oil the inner chambers of the flute.
- Vice (aff) – you will really need a vice to hold things down. It comes in handy when you want to carve the inner chambers of the flute, or when you need to carve the block. Whenever I drill things, or carve the chambers, or use a chisel on the wood, or make a nest and sound mechanism, or I shape the flute block, I hold the wood down in a vice. It make things much easier, and it saves me the costs of my health insurance.
- A long wood dowel is very useful, too – you can attach sanding paper to one of its end with some duct tape, and this will give you a bore sander tool :). A piece of fabric can be attached in similar fashion, and there you have – a bore oiling tool.
- Duct Tape – trust me, this one will come in handy a lot.
- Finally, pieces of leather strap will be needed in the end to tie the block/bird to the rest of the flute. Shellac resin and food grade alcohol may be needed if you wish to apply shellac laquer onto the flute. Vegetable oils are required to finish up the flute and protect it against moisture. Some scissors may come in handy.
That’s it – here’s (probably) the complete list of basic tools that you need to create a simple Native American style flutes.
Don't forget to become a fan on Facebook and subscribe to new posts via RSS or via email.
More from my site
 Power Tools for Making of Native American Flute – Part 1
 How to Build a Block (Bird, Fetish) for Your Native American Flute
 How to Make Branch Flute – Part 1: Introduction
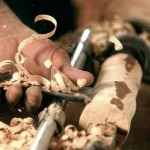 Basic Safety Rules for Crafting Flutes
 How to Play a Note on Native American Flute (Video)
 How to Learn to Play Native American Flute
 via EMAIL