


Obtaining a piece of bamboo is the simplest way to start your adventure with making flutes. While the bamboo wood is a bit hard to work with, it’s hollow on the inside and it contains separating “notes”, or walls, that make it easy to build many types of ethnic flutes, including Native American flute.
In this article, I share some ideas about using bamboo for building Native American flutes. Keep in mind that tutorials about building a nest or tuning the flute have been published on FluteCraft in the past and they are linked in this article, but I will not double these things here, since the techniques are still the same.
Start With the Bamboo
Bamboo is easy to obtain – it should be available in your local garden store, as it is used for creating simple fences or as a support for other plants. If you can’t find it, it might be possible to order it on-line. Just as the on-line store to send you pieces without cracks and with intact inside nodes/walls. Tell them you want to build flutes and be nice – you may get nices pieces in return :).
- Update 26.02.2018 – Thank you, Steve! Always use bamboo that is already very, very dry. Any wood with holes in it may crack and split as it dries, so whenever you use bamboo, lumber or branches, make sure to dry them first.
Bamboo is a very strong plant, and it makes great flutes, among many things. Did you know you can eat bamboo and turn it into a whole building in a style of modern architecture? :) Anyway, bamboo comes in various sizes and colors, depending on the species of the bamboo.

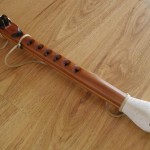
Bamboo Native American Flute – This is actually the very first flute I have ever built :).
Another advantage, beside availability, is the fact that bamboo is usually hollow on the inside – once it matures enough, that is. Young and thin bamboo is not hollow, but the older and the bigger it gets, it becomes hollow. But there are also walls within it that separate chambers – these clearly visible walls are called “nodes” by some people. Sometimes, depending on the species and age of the bamboo, they may not be solid anymore, and there might be holes in them, but in most cases, they are intact – which makes building two different chambers in your flute much easier.
River Cane is a bamboo-like plant that grows in North America and it can be used to make flutes, as well. It’s quite popular among flutemakers in the USA, but since bamboo is more popular around the world, for the rest of this book, I will focus on bamboo. If you have river cane, though, it’s really very similar to work with.
Everything Else is the Same
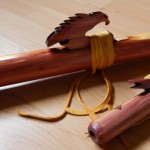
Let’s get into more details. Here’s an example of a flute nest in a piece of bamboo. It is made above the inner wall – the node – which you can recognize by the thicker area outside, like on the photo below.
An example of a nest in a bamboo Native American flute. That middle “thicker” part is the outside of the node. Inside, in healthy bamboo there is a wall. As you can see, I placed the flute’s nest above it.
When making a bamboo flute in Native American style, the first thing to do is to define the key we want. You should recall the table with measurements for each key, bore diameter and width of the sound chambers.
With this table in mind, look at your bamboo – how thick is it on the outside? The walls may be anything between 3 to 5 mm. Take this into account, and you should figure out how wide the inside diameter is.
For example, I had this piece of bamboo that was 27 mm wide on the outside. It was a meter long. I took a look at one of the ends to see how thick were the walls. They were 4 mm thick. The thickness of the walls varies throughout the bamboo piece, but not really that much – so I figured out the inside diameter of the chambers is around 18 mm (27 minus 4 minus 4 is 19 mm, and 18 mm can be found in measurements table). I took a look at measurements table and 18 mm wide inner bore is good for a flute in the key of A4 with the sound chamber of about 300 mm long.
All I had to do now was to choose one of the nodes – they are visible on the outside as thicker areas with a grove running through them. This would be where the nest and True Sound Hole would be placed.
From that node, I calculated 340 mm down (towards the South end of the flute) and marked when I had to cut the wood piece. I always leave additional 20 to 40 mm for safety – tuning the flute requires to cut the material from the flute’s end. From the same node, I measured 100 mm up (towards the North end, the mouthpiece), and marked my second cut. This shorter chamber would become my air support chamber. And finally, I made the cuts.
After cutting the bamboo, I took a look inside, against the source of light, like a lamp or window (no direct sunlight, of course) – I saw nothing but darkness. Basically, it means the wall between the two chambers is intact and it will work very well.
The final thing to do to prepare this piece of bamboo was to glue some sanding paper onto a long dowel, and sand the inside of the bamboo – this removes the soft material and leaves the hard, clear chamber. Or you can just use some duct tape to mount the sanding paper on the dowel.
Sometimes, you have to drill through a node to build the longer sound chamber. Some people just force their way through the node by hitting it with a long dowel. Others, like me, attach a long drill bit to the power drill and drill through the inner node. Just be careful not to drill through the node between air and sound chambers.
A dowel with a sanding paper attached – great for cleaning the inside of the bamboo.
This is all that is required to prepare a piece of bamboo for flutemaking. Everything else is the same as with other types of woods, either branches or construction lumber. Choose the node, make the nest, drill the note holes and tune everything.
I’m not a fan of working with bamboo, because I do not like the smell, especially when I burn the holes inside the bamboo. But I do have a couple of bamboo flutes – the wood is hard, and it makes loud, clear-sounding instruments. Because of the sizes of bamboo and its availability, it’s very easy to make long bass flutes with it. And because it’s very simple to turn a piece of bamboo into a flute, it’s a great type of material to be used in fun flutemaking workshops.
Nests in Bamboo Flutes
Making a nest in a bamboo flute is not that different from other types of wood – you need to create a flat surface. To do so, usually we can mark 30 mm in both directions, starting from the node that separates both chambers of the flute.
A long piece of bamboo.
Then, you can use a knife or a saw to cut vertically into the bamboo, say 1-2 mm, and then use a knife to remove the material between the cuts.
Make the cuts, marking the ends of the nest.
Remove the material between the cuts.
Finally, use a sanding paper to flatten the surface.
Drill the holes on both sides of the node – they will be turned into a sound mechanism.
At this point, you can make the rest of the nest. Tutorial explaining how to do it can be found on FluteCraft.
How to Make Branch Flute – Part 5: Creating the Sound Mechanism
The above article explains how to build the nest in branch or lumber flutes. The only diifference is that you have to work from the outside this time, with no access to the inside. This isn’t as difficult as it may seems. Once you have the two holes drilled on both sides of the nodes, mount the piece of bamboo in a vise, and then you can use:
- A Dremel (aff) – I’m using Dremel 4000 for my flutemaking work. I mount a router bit in the Dremel and then I gently enlarge the holes, trying to shape them into rectangles. Once they are large enough, I use diamond files to square all the corners. I then use a flat chisel to cut the air channel between the two holes. If I don’t want to make the air channel in the flute’s body, I leave the area flat, and I cut the nest in the flute block itself. I then use a small flat diamond file to sand down the 45 degrees angle on the inside of the True Sound Hole, from the outside. The walls of the bamboo are thin enough, so this task isn’t difficult.
- If you don’t own a Dremel, you can use diamond files to do all the work, it just takes more time :).
- If you own only drill bits and round file, just drill the holes, and then use the round file to file the 45 degrees angle in the round True Sound Hole. The problem is that round sound holes are less loud and more difficult to tune, and they can make airy sound. But it’s possible to build a flute without rectangle True Sound Hole.
Add a block next and you have yourself a flute :).
Don't forget to become a fan on Facebook and subscribe to new posts via RSS or via email.


 via EMAIL