


Making a Native American style branch flute is a rewarding experience. It is an ability to create wonderful instrument with your own hands. This post is the first article in a series of practical tutorials in the “How to Make Branch Flute” project. I will guide you from start to finish on your flutemaking journey. We will start with learning about wood and branches. Then I will explain how to carve the inner chambers, how to create the nest and sound mechanism, and finally how to tune the branch flute to pentatonic scale. We’ll finish the project with learning how to finish the flute with shellac and/or food grade oils.
And all of this will be supported with many photos and illustrations. Be sure to learn the articles on flutemaking safety and prepare the basic tools to make a Native American style flutes.
The Beauty of Branch Flutes
Branch flutes are wonderful – in most cases, they must be handcrafted – the amount of tools that can operate within the branch is limited. Also, each branch is unique, thus each flute is unique, with its unique sound, tune and “feel”. There is some kind of magic in this uniqueness. And the sound of branch flute is wonderful.
- A branch flute can be big or small, thick or thin and can have so many different colors. It allows us to truly express our inner creativity and attend the crafting process from the very start to very finish, from taking effort to find the proper branch, through patience to dry it, to art in order to turn it into a musical instrument.

A couple of branch flutes I made. They are covered with shellac which gives them this “yellowish” look.
When I was starting out with my flute craft journey, I prefered branches because they already had the necessary round shape and since I had no lathe or other tools to round the wood, and I had problems with a wood itself, the branches easily available were an obvious choice. As long as you do not live in a big city, branches are easy to find.
Crafting a flute out of a branch is a careful and true art of craft – it requires care, patience and enjoyment in what you do.
Making a branch flute is simple and fun, BUT: only if you remember about safety rules, and you’re patient, and only if you know that mistakes at first are lessons to be learned and not the final failures.
You do not need a lathe to round the branch – branch is already round. Its bark can create wonderful textures, too. In order to change the branch into a flute you need to carve the two inner chambers. Learn the anatomy of the Native American Flute first.
I recommend using a branch of pine, spruce or similar soft wood at first – soft wood is good for beginners. It doesn’t require too many skills nor tools nor strength to create your first, basic flute that sounds great.
There are two ways to make a branch flute. Either you split the branch and use chisels to carve the inner chambers, or you drill the branch. For now, I will teach you how to make split flutes, because building a machine to drill the branches is a lot more complex and requires more tools, time, money and space.
6 Steps to Make a Branch Flute
In order to make a Native American style branch flute, you need to follow the steps:
- Grab a branch – find a proper branch and dry it, so that it’s perfect for your own flute.
- Split the branch and carve the chambers – split the branch in two, and use chisels to carve the two inner chambers of the flute.
- Create a nest and sound mechanism – then create a sound mechanism that includes two holes, a block and an air channel below it.
- Glue the branch back together – when this is done, you need to laminate (glue) the branch back together and let it dry.
- Tune the flute – then we can establish the final fundamental note, make the five (or six) finger holes and tune the flute to a pentatonic scale.
- Finish the Flute – once tuning is done, the flute can be finished, polished, oiled and decorated.
Generally, these are the main steps to turn a branch into a flute. This entire series of tutorials will cover all these elements in details, so that you learn how to craft the flute.
If you wonder, yes – this series of tutorials can be applied to lumber bought in a hardware store or lumber stock. Just replace “branch” with any type of lumber you have that is already to proper dimensions.
Unfortunatelly, I can’t just tell you “take a branch that is XX inches long and XX inches thick” and guide you through every single quarter of an inch – because in case of branches, it would not work. Every branch is unique.
Instead, I will guide you now through phases of turning a branch into a flute explaining the math behind the flute, so that you can apply it to any branch you find. And I’m going to do so in such way that you have all the necessary information so that you can turn most of your branches into flutes. Most of them, because the sad truth is – some branches just won’t play no matter how hard you try. Trust me – sometimes the flute doesn’t want to come to life.
NEXT:
The next tutorial will cover the branches. You will learn how to find a branch, what kind of branches are good for flutes and what kind of branches are not good, and you will learn how to dry the branch, so that becomes ready to be turned into a flute.
Don't forget to become a fan on Facebook and subscribe to new posts via RSS or via email.
More from my site
 How to Make Brach Flute – Part 8: Finishes
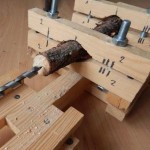 How to Build a Jig for Drilling Branch Flutes
- How to Make Branch Flute – Part 7: Sound and Tuning
- How to Make Branch Flute – Part 6: Sanding and Gluing
- How to Make Branch Flute – Part 5: Creating the Sound Mechanism
- How to Make Branch Flute – Part 4: Carving the Main Chambers
 via EMAIL