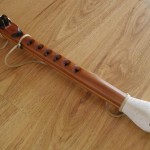
Tuning the Native American style flute to pentatonic scale often seems like a challange. I won’t lie to you – at first, it really is a challange. There are few steps necessary to tune the flute – calculate the finger holes placement, drill the holes and finally tune them to scale. To make the entire process simple, I’ve created this short series of articles on tuning the Native American flutes.
In this series, you will learn how to define the fundamental note of the flute; how to calculate finger holes placement; how to drill the holes, how to tune them. I will provide you with tuning table, so you’ll be able to tune your flute to any note you want. But first, you need to learn the basics. Part 1 of this series covers the theory of music, the basics of tuning and explains the tuners – either as stand-alone devices or as software to be installed on your computer. Let’s begin!
When the rest of the flute is ready, it’s time to tune it – this means you need to make finger holes and tune them to proper notes. This requires some basic knowledge. But first, remember that it is very important to begin tuning process only after the rest of the flute is ready, but before oiling or sealing the wood in anyway. That means the chambers must be finished, and the sound mechanism, along with splitting edge and final block, must be ready and finished.
Any changes made to the walls of the flute or sound mechanism after the finger holes are drilled and tuned, will result in losing the tuning. Once this is clear, we can move further.
In order to tune the flute, you will need some kind of tuner. It can be a simple stand-alone tuner device, or a tuner software installed on your computer. So far I used only that second type. There are few software tuners available for free as Open Source, so google around and you should fine some.
Update: 13.02.2016: if you own an Android tablet or smartphone, there’s an app for tuning: gStrings. I’ve tested it, and it works nice. There are also other tuners for Android, but I never tested them. I’m also positive there are tuners for iOS.
Pentatonic Scale
Most modern Native American style flutes are tuned to minor pentatonic scale. This scale requires five finger holes, but some makers add one more hole, often called „the sixth hole”. This hole is used in some melodies or for additional sound decorations, but in reality, it is not required for pentatonic scale. Don’t worry, I’ll explain everything later.
The sixth hole is actually the fourth hole – we count the holes from the bottom end of the flute. If you do not wish to create the sixth hole, you don’t have to do so in your flute. If you do create it, you can always cover it with a piece of leather or something similar.
Modern pentatonic scale is not really that traditional. It’s very possible that Native Americans tuned their flutes to something very close to our modern pentatonic scale, but in the end, we’re still talking about Theory of Western Music. Also, there is a theory that Native Flute’s tuning is a result of copying the tuning of Shakuhachi. Anyway, the pentatonic scale is still very pleasant to listen to.
The minor pentatonic scale has six sounds – the first, main sound with all the finger holes closed is called the fundamental note of the flute. The five other sounds are made by five finger holes. The fundamental note, as well as other notes, are described („called”) with letters, sometimes with additional symbols, like A, F, F#, G4 etc. Don’t worry, I’ll explain everything in details soon.
Tuning Simplified
In order to tune the flute, whether it’s made of lumber, or a branch, or a bamboo or even plastic, you need a tuning software, a burning tool to make holes, or at least a drill with drill bits. Of course, if you’re using a tuning software, you need a microphone connected to your computer, as well.
Tuning the flute usually looks like this:
First, you turn on the tuner or launch the software, then you blow the air into your flute and the tuner will show you what note is played – this note will be called by its letter and digit. If the note isn’t steady or high enough, you enlarge the hole either will drill bits, or with burning tool, then blow the air into the flute and check the note again. And so on, so on until the note is tuned properly. The entire tuning process is based on looking at the tuner, blowing and enlargening the hole, all in repeated fashion until the entire flute and each finger hole is tuned.
Well, it’s not really a dynamic or exciting work, but it gives results.
The Basics of Tuner
When you basically know how tuning process looks like, you need to learn some basics about tuners, as well. Most tuners, whether they’re a software or separate device, have few elements in commons. For example, the ability to change the frequency of the sound. Most flutes these days are tuned to A=440 Hz, which is a standard concert pitch. Sometimes, flute makers tune their flutes to Verdi pitch, that is A=432 Hz. Most tuners allow you to change the tuning pitch.
Also, most tuners show you if the note is clear or not. A clear note is often shown in a „green zone” if such zone is displayed on a tuner, or it is described as missing the clear zone by few cents one way or another. For example, a pure A note should be shown by the tuner in a green zone. But if the tuner shows that A is not clear and it’s an A minus 20 cents, it means that the note is too low and it must be higher in order to a clear note. If the A is A plus 20 cents, it means the note is too high, and must be lower in order to be a clear note.
Take a look at the image below. It shows an example of a tuner – in this case, it’s a software tuner, but most tuners look similar.

An example of a tuner – Free Music Instrument TunerVersion 0.99.2 – http://gillesdegottex.github.io/fmit/
An example of a tuner – Free Music Instrument TunerVersion 0.99.2 – http://gillesdegottex.github.io/fmit/
Let’s take a closer look.
- 440 Hz is a tuning frequency – it can be changed.
- This is the note being plaed – in this example, the note registered by the mic was B3.
- This is the frequency of the sound from #2.
- This part of the scale shows the „minus” cents.
- This part of the scale shows the „plus” cents.
- The pointer shows how much the sound being played misses the green (clear) zone. In this case, it’s about minus 16 cents, so the note is a bit too low to be considered clear.
- Green zone – when the pointer gets here, the note is clear enough.
The whole point of tuning is to bring the played note as close to the green zone as possible. Remember that most tuners will look similar to the tuner on the image above.
The Basics of Notes
Well, you can’t really build and tune an instrument if you do not have the basic knowledge about music theory. This is what I’m going to discuss now. Don’t worry – these are the basics served to you with very simple language.
The very first thing you need to know is an octave. In very simple words, we consider eight octaves to be important for Native American flutes – sub-basses (0), contra-basses (1), basses (2), baritones (3), tenors (4), altos (5), sopranos (6) and sopraninos (7). The digits next to the name of the octave is the digit displayed next to the note’s letter – go back to the tuner’s photo earlier – the B3 note means it’s a note B in the third octave, in case of Native Flutes called „baritone”. Most Native American flutes are tuned to tenor octave as the fundamental note, and plays a couple of notes in the alto octave.
The octave itself, when we skip the complex musical terminology, is a set of notes placed between two exactly the same notes in two different octaves. For example, an octave is a set of all the notes between A3 and A4. „A” is the same note, but as the digits suggest, it’s a note in two different octaves. 8 full notes is the number of notes in an octave. For example, for the note A, an octave looks like this:
A, B, C, D, E, F, G, A
Soon, you’ll be tuning the flute to the pentatonic scale. This scale does not contain all the notes from an octave, but it starts and ends with the same note – of course, in two different octaves. Now, let’s move on.
The theory of music tells us we have three types of notes – clear notes, sharp notes and flat notes. For example, see the note „F”:
- F# – F-sharp
- F – clear F
- Fb – F-flat
And we have seven letters for the seven main notes. Here’s the order of the notes.
C → D → E → F → G → A → B
After the note „B” we would post note „C” and start everything over agian, just an octave higher. Between these seven main notes, we place their flat and sharp variations:
Cb → C → C# → Db → D → D# → Eb → E → E# → Fb → F → F# → Gb → G → G# → Ab → A → A# → Bb → B → B#
The order of the notes is importat. For example, when you see, on your tuner, a note E being played, and you wish to tune the flute to the note F, it’s possible, because F is a higher note than E. But you won’t be able to tune the flute to D, because D is lower than E.
But – there’s one more thing – the following notes are the same notes – some tuners display them as C#, other tuners display them as Db, but in the end, it’s still the very same note.
- C# is Db
- Eb is D#
- F# is Gb4
- G# is Ab
- Bb is A#
Being aware of this simple fact will help you, because not every tuner will display exactly what is shown in the pentatonic scale table – which I will post soon.
That’s it for now – in the next post, we will define the fundamental note of your flute, I will explain the importance of sound wave’ length and you will read about direction holes, often called tuning holes.
Don't forget to become a fan on Facebook and subscribe to new posts via RSS or via email.


 via EMAIL